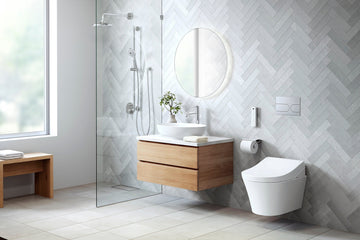
In today's world, the bidet has become a symbol of modern hygiene and environmental consciousness. Many homeowners are now considering installing a bidet to enhance their bathroom experience. If you're among those curious about how to install a bidet, you're in the right place! This guide is tailored for those in the industry QA field, providing a comprehensive yet straightforward approach to installing a bidet in your bathroom.
Installing a bidet might seem daunting, but with the right tools and guidance, it can be a rewarding DIY project. You'll not only ensure a more hygienic lifestyle but also add a touch of luxury to your bathroom. Before diving into the installation process, it's crucial to understand the different types of bidets available and the specific requirements for each.

Understanding Bidet Types
Before you begin the installation process, it's essential to choose the right type of bidet for your bathroom. There are primarily two types of bidets: standalone bidets and bidet attachments.
Standalone Bidets
Standalone bidets are separate fixtures that require additional plumbing. They are typically installed next to the toilet and are common in European bathrooms. Installing a standalone bidet involves setting up a new plumbing line and requires more space.
Bidet Attachments
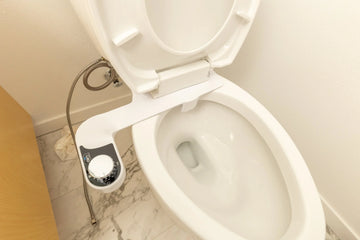
Bidet attachments are more popular in smaller bathrooms, especially in the United States. These attachments can be easily installed on existing toilets without any major plumbing adjustments. They are cost-effective and take up less space.
Essential Tools and Materials
Once you've chosen the type of bidet that suits your needs, gather the necessary tools and materials. Here's what you'll need:
- Adjustable wrench
- Screwdriver
- Teflon tape
- Bidet (standalone or attachment)
- Flexible water supply hose
- Plumber's tape
Having these tools ready will make the installation process smoother and less time-consuming.
Step-by-Step Bidet Installation
Installation for Bidet Attachments
1. Turn off the water supply: Locate the shut-off valve near your toilet and turn off the water supply to prevent any leaks.
2. Remove the toilet seat: Use a screwdriver to remove the toilet seat, allowing access to the rim of the toilet bowl.
3. Attach the bidet: Position the bidet attachment on the toilet rim, aligning it with the bolt holes. Secure it in place using the provided screws.
4. Connect the water supply: Attach the T-valve to the toilet's water supply line. Connect one end of the flexible hose to the T-valve and the other end to the bidet attachment.
5. Turn on the water supply: Open the shut-off valve and check for any leaks. Adjust the connections if necessary.
Installation for Standalone Bidets
Installing a standalone bidet involves more complex plumbing work. It's advisable to consult a professional plumber for this type of installation. However, if you're experienced with plumbing, follow these steps:
1. Plan the layout: Determine the best location for the standalone bidet, ensuring there's adequate space and plumbing access.
2. Install the water line: Run a new water line from your existing plumbing to the bidet location.
3. Set up the drainage: Ensure the bidet drain is connected to the existing sewage system.
4. Secure the bidet: Mount the bidet to the floor using the provided bolts and secure it in place.
5. Connect the water supply: Attach the bidet to the new water line using flexible hoses and connectors.
Final Checks and Adjustments
Once the bidet is installed, it's crucial to perform some final checks and adjustments:
1. Test the bidet: Turn on the water supply and test the bidet's functionality. Check for any leaks or loose connections.
2. Adjust the spray settings: Depending on the bidet model, you may have multiple spray settings. Adjust them to your preference.
3. Secure all connections: Ensure all connections are tight and secure to prevent any future leaks.
Maintenance Tips
To keep your bidet in top condition, regular maintenance is essential. Here are some tips:
1. Clean the nozzles: Regularly clean the bidet nozzles to prevent buildup and ensure optimal hygiene.
2. Check for leaks: Periodically check all connections for leaks and tighten them if necessary.
3. Use gentle cleaners: Avoid harsh chemicals when cleaning the bidet to prevent damage to the components.
For more comprehensive tips on maintaining and installing bidets, you can visit this resource.
Enhance Your Bathroom Experience
Installing a bidet is more than just a functional upgrade; it's a commitment to better personal hygiene and environmental sustainability. By choosing and installing the right bidet, you're taking a significant step towards a modern and eco-friendly bathroom experience.
If you're interested in exploring more about bidet types and installation tips, consider checking out this guide or learn about specific features like dual nozzles and night lights.

FAQ
What are the benefits of installing a bidet?
Installing a bidet offers numerous benefits, including improved personal hygiene, reduced toilet paper usage, and a more comfortable bathroom experience.
Can I install a bidet myself?
Yes, many bidet attachments are designed for easy DIY installation. However, standalone bidets may require professional plumbing assistance.
How do I maintain a bidet?
Regular cleaning and inspection for leaks are essential for maintaining a bidet. Use gentle cleaners and ensure all connections are secure.
Embrace the future of personal hygiene by installing a bidet in your bathroom. With the right tools and guidance, you can enjoy the luxury and convenience of a bidet in no time!
This article contains affiliate links. We may earn a commission at no extra cost to you.